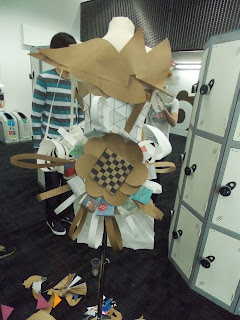
Below you will be able to see several creations me and a fellow created after we were put into a group together and asked to collaborate and make designs using other people's sample. As you go down you will be able to see other's samples they created using paper as well as the way we chose to place the samples to fit the model.
First Application
The first application as seen above shows the front (left) and back (right). I personally prefer the back of the model more than the front because of how the beautifully cut paper has been draped over the back. The front looks really busy and could benefit by taking away certain aspects. If there was more of the cut out paper like the back me and my partner agreed it would look well on the front to tie it in more.
Second Application
Above you can see the second application, this was given a theme of 'Angry', there was not that many samples and therefore we struggled to cover up the back. However me and my partner in the task really liked the spikey collar which we used to represent anger and majestic qualities. Layering the cut out pieces of paper meant we could work a really nice piece.
Third Application
During this task we was asked to focus on the bum area and create pieces to be worked on this area. Therefore collaborating we discussed what best to do with the samples we were given. I decided on using the layered flower origami as ruffles on the sides whereas my partner created the stars pinned together to create a star tail which could work well over other pieces. If we could have had longer we would have kept pinning the smaller flowers under the larger flowers to create more volume.
Fourth Application.
The subject for this task was 'Tidy', therefore we kept our pieces at the front and back very orderly and neat. Meaning all the white sections of the dress would be organised together at the front and the brown sections together at the back. If I could alter anything looking at it now as a photograph I would take away the bag on the arm and remove the bow just so the dress was more tidy.
The dresses below were designs me and my partner used with our own samples.
Our Sample Design 1
I like this design because it used a lot of samples and different scale, we wanted to use my partner's big brown 3D sample (seen on the bum on this picture) was unsure of how to work it into the design. We chose to have it on the bum like a French period dress. The sharp shoulder illusion was created by using one of my sample's on the back. I like the little hints of pink and blue which my partner created. I we could redo this I would probably play around with making the big brown section less visible and work it into the design more.
Our Sample Design 2
This is my personal favourite of all the designs, using my weaving sample I suggested we use it as the collar and chest section to create colour and allow other sections to be layered on top of it. The back of the dress is very sharp and symmetric and goes well with the triangular samples I created. The pink and blue paper on the back allowed for more colour to be added.
Our Sample Design 3
We used Design 2's basis to work more onto the design, flattening one of the brown origami's we were able to make a really interesting texture. I really like the simplicity of the back and the sharp edges. If I could add anything to the front I would put another triangular shape to create more of feminine shape.
Below you will be able to see everyone else who used our samples to create their designs in the same way me and my partner used the other samples.


No comments:
Post a Comment